If you have purchased Wavlink WiFi extender or router means you have some reliable tool to strengthen your home network. But the complete benefit of it can be takes if the setup is done through wifi.wavlink.com is essential. This web-based configuration page allows you to connect your device with your main network, manage settings and keep your firmware updated.
But most of the users face the issues related wifi.wavlink.com not working. This blog helps you to go through practical setup advice, explains why the page sometimes refuses to load and provides you with easy solutions.
How to Access the wifi.wavlink.com Page?
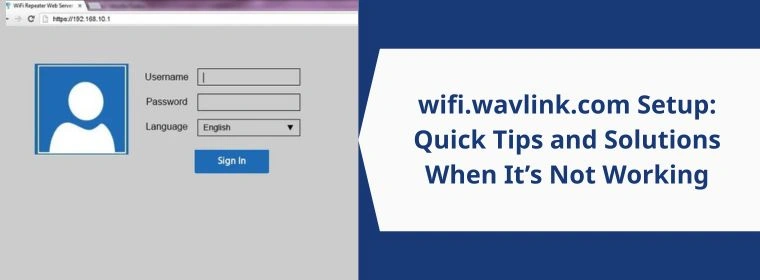
The wifi.wavlink.com page works as the central hub for your Wavlink device. When it is powered on and connected then after that type the address into your browser and the setup dashboard will open for you. From there, you can:
- Configure the SSID and password.
- Connect the device to your existing WiFi.
- Can update firmware for better performance.
- Adjust advanced settings like security modes and channel selections.
It is essential to note that this page works only when you are directly connected to your Wavlink device that to either through Ethernet or its temporary WiFi during setup. If you avoid this step then you will face wifi.wavlink.com not working issues.
Top Reasons Responsible for Connection Issues
Some common causes include:
- Not connected to the Wavlink network – It is important that your phone or computer should be connected with your extender’s or router’s network before going to Wavlink setup page.
- Typing mistakes – Even an extra space or wrong spelling will block access.
- Browser cache issues – Old saved data can prevent the setup page from loading.
- IP conflict – Another device on the network may be using the same IP range.
- Weak signal – Being too far from the device during setup may cause connection drops.
Steps to Successfully Reach the Setup Page
If you want to access the setup without any delays, just make sure to follow the below mentioned steps:
- Step 1: You have to plug your device wait until the power light turns to solid.
- Step 2: Make sure to link your phone or computer with the Wavlink network which is something like “Wavlink_”.
- Step 3: Go to a browser and type in the address bar http://wifi.wavlink.com and there should be no extra spaces or wrong extensions.
- Step 4: If the page does not load then you can use the default IP address that is 192.168.10.1.
- Step 5: If the page refuses to open then clear your browser’s cache or try to switch to some other browser.
Fixing Problems When the Page Refuses to Load
If Wavlink setup page working continues even after following the above, try these solutions:
1. Check Connections Properly
Verify that the Ethernet cable is plugged in properly or make sure that your device is firmly linked to the Wavlink WiFi and not your main home network.
2. Restart the Device
Turn off the device for about 20 minutes and then turn it on back. This quick restart can fix small errors.
3. Use the IP Address
If the setup page is blocked by DNS issues then enter the IP address 192.168.10.1 directly into the address bar of your browser.
4. Disable VPNs and Firewalls Temporarily
Local addresses are generally blocked by security tools. Make sure to turn them off till the time of setup process.
5. Reset to Factory Settings
If nothing else works, hold the reset button for 10 seconds until the lights flash. This restores default settings so you can try again from scratch.
How to Keep Your Wavlink Running Smoothly
Once you have completed the setup through wifi.wavlink.com, keep your device in good state by:
- Regularly update the firmware to avoid any compatibility problems.
- Make sure to place it away from thick walls or heavy metal objects that make signals weak.
- To ensure stability, use Ethernet for setup.
- Bookmarking the setup page for quick access later.